
Today, we are going to fix the most common mistakes that people make when they’re new to iOS development. This error takes place when we work with user interface while adding or deleting the elements. To make things easier we are going to first replicate the error, then analyze and finally fix it.
Ready? Let’s go.
Class Not Key Value Coding Compliant
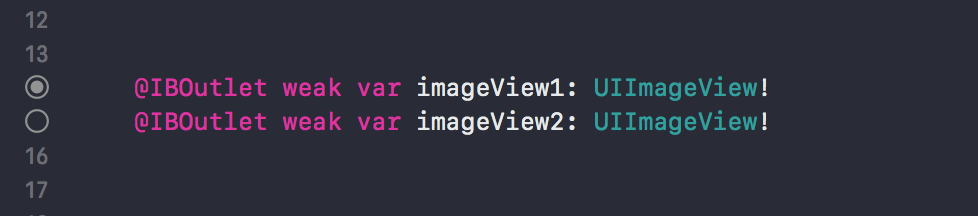
As you can see I have two IBOutlets in my View Controller. The first IBOutlets is called imageView1 which is exactly how we wanted to name it but the second one I’ve accidentally spelled it wrong. Now the error happens when you try to fix it.
Instead of calling image2, I’m going to call it imageView2. Even though everything looks great and I’ve fixed the spelling error there is a problem. The first indication that we made a mistake is the little circle on the left side of the IBOutlet. Remember that when the circle is filled connection is active, but now the circle is empty and it’s not linked to anything.
If we run the app it will crash due to uncaught exception ‘NSUnknownKeyException’ which this is a very common error in Xcode.
In the beginning, when you are debugging Xcode projects it can be very difficult and frustrating to understand error messages. However, over time, you’ll start getting used to those error codes and what they mean.
Understanding Error Message
Now the important keyword in this error message is: “this class is not key value coding-compliant for the key image2“. To translate this, Xcode is trying to tell us that there was something called image2 which it can no longer find. Our aim is to figure out where does the key image2 comes from, which we renamed in the View Controller. Now let’s go hunting for this error.
By renaming the IBOutlet, we’ve actually broken the connection, because when we hover over it no longer highlights the second image view but that connection is a piece of XML code that exists in Main.storyboard

So if we open the Main.storyboard as Source Code you will be able to see that we have two connection. There is one outlet called imageView1 and there’s another outlet which is called image2. So because we haven’t broken the connection when we renamed the outlet it still remains in the storyboard and causes our app to crash.
Fixing the Error
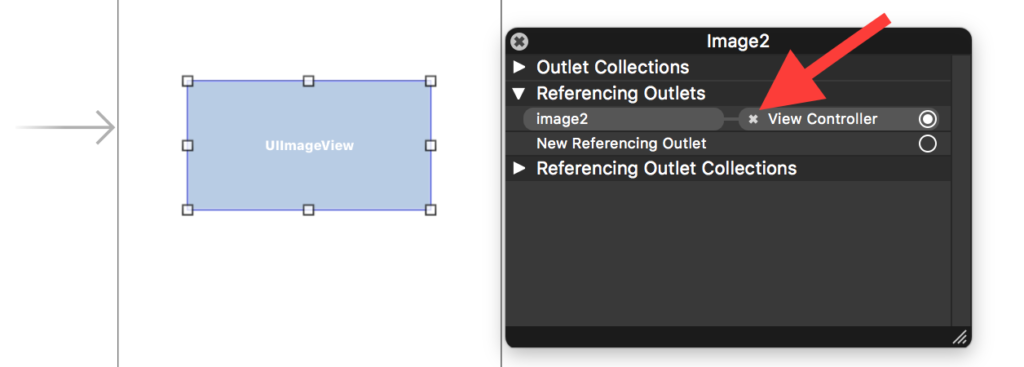
If we right-click on the image view, we can see that there is a reference outlet to the View Controller with a key called image2. Now we are going to break that connection by clicking the little cross button, which will also erase the code in the XML file.
If you’re trying to edit the IBOutlet, make sure that you first delete any old connections with that outlet.
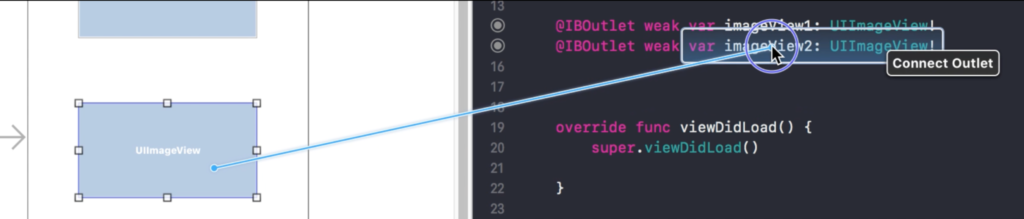
Now I can recreate a connection to the newly named imageView2 in the same way that we created the previous one. You hold down the control key on the image view and drag it over. The process might look slightly different since we already have named the IBOutlet. So when you mouse over to the imageView2 it will highlight the area in blue, which means that it links it up to this line of code.
Using the Connections inspector
Another way to fix this error is to open the right side panel, then select View Controller and switch to the Connections inspector. Now if you look closely at the connections inspector you have all the outlets listed. If you move the mouse at each outlet it will show you the UIElement it is associated with. On the right side, if the dot is filled then the connection is properly established. But if it has an exclamation mark then something is wrong with this outlet and it’s causing a problem.

You can fix the error by breaking the connection that is causing the problem. Simply click the X to delete the outlet. Then you can go back to the View Controller and simply recreate the connection. Just hold the control key and drag and drop the mouse pointer to the outlet you want to connect. You will notice that the dot on the right side is filled-in again which means that everything is working.
Now if you select View Controller and then open up connections inspector you will see that there are no exclamation marks. So the error is fixed and you can run the app.
Congratulate! Now your app won’t crash again.
Conclusion
Even though Xcode looks so clean and simple there are lots of hidden features and it takes time to find and learn all these things. So whenever you get the error: “this class is not key value coding-compliant” you should first and foremost think if you recently changed something that has a connection to the Main.storyboard or to the design file.
For the most time, there is an unbroken connection to something that no longer exists in the code.
Leave a Reply